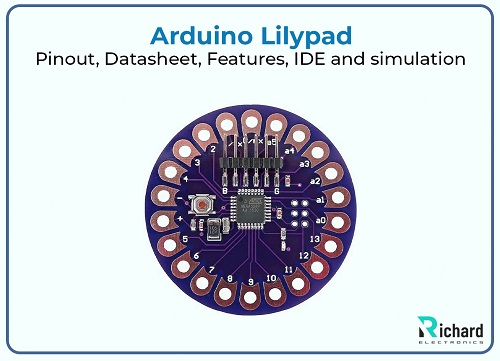
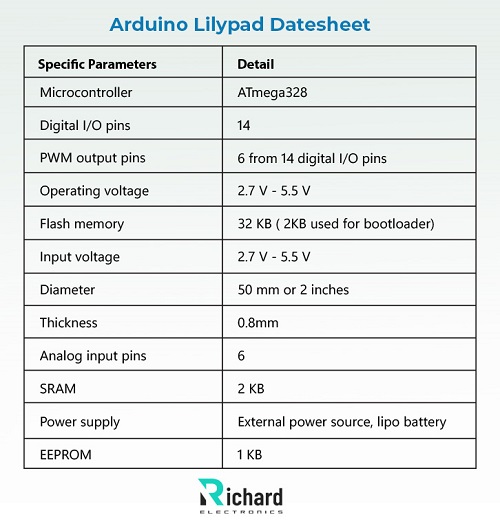
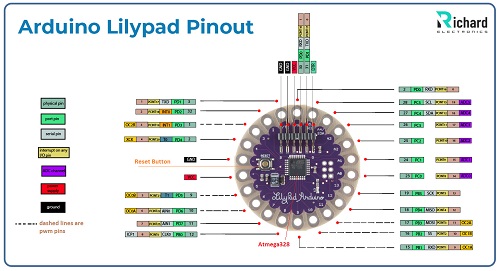
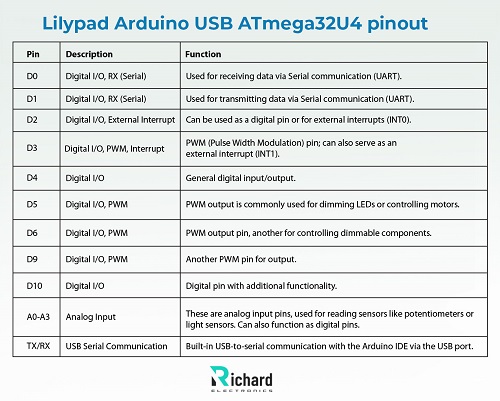
It is sewn to fabrics, power supplies, sensors, and actuators with conductive thread. You attach it directly to your computer using a micro USB cable only. The Lily-pad Arduino USB is a microcontroller board based on Atmega32u4. It has 9 digital input/output pins, 4 of which are used as PWM outputs and 4 of which are analog inputs. It also has an 8 MHz resonator, a micro USB connection, a JST connector for a 3.7 LiPo battery, and a reset button. In this article, I am going to discuss basic information about Arduino Lilypad USB including the introduction, history, datasheet, specifications, main features, pinouts, IDE, and applications. I hope this article will be helpful and informative for you. Let’s start: â— The Arduino lilypad, part of the Arduino ecosystem, is round-shaped and easy to integrate into various fabrics. â— The conductive pads located at the perimeter allow for easy connection using connecting thread, facilitating a flexible and sewable approach to electronics. â— The board is typically based on ATmega328 (in the standard Lilypad) or ATmega32U4. (in the USB version), both work at 16MHz. â— It has 32 KB flash memory from which 0.5 is reserved for bootloader. â— It has a 2 KB SRAM for data storage during program execution. â— It has 14 digital input/ output pins, with several able to provide PWM (Pulse Width Modulation) output. â— It has 6 analog input pins for reading various sensor data. â— The Lilypad is powered by small batteries like coin cell batteries and rechargeable lithium polymer batteries. â— It is designed for efficient power usage to extend battery life, crucial for wearable applications. â— The Lilypad is programmed using the widely accessible Arduino Integrated Development Environment (IDE) which simplifies the process of writing and uploading code. The Arduino LilyPad represents a significant evolution in the field of wearable technology and e-textiles. Arduino was founded in 2005 in Ivrea, Italy, by a group of students and professors. The goal was to create an open-source platform that would make electronics more accessible to artists and designers.  In the early 2000s, as wearable technology began to gain traction, researchers and designers started exploring ways to integrate electronics into textiles. This movement focused on creating garments and accessories that could respond to user interactions and environmental conditions. The LilyPad was developed by Leah Buechley, a researcher at the MIT Media Lab, as part of her work on e-textiles. It was specifically designed to be sewn into fabric, making it suitable for wearable projects. Buechley aimed to create a platform that combined traditional textile craft with modern electronics, emphasizing aesthetics, ease of use, and functionality. Like other Arduino products, the LilyPad was released as open-source hardware, allowing makers and developers to create their variations and applications. This openness fostered a community of creators who began experimenting with the platform. The LilyPad Arduino is a series of microcontroller boards designed specifically for wearable electronics and e-textile projects. Below is a detailed explanation based on the typical LilyPad Arduino USB (or ATmega328 version) datasheet specifications.              Specific Parameters                    Detail Microcontroller ATmega328 Digital I/O pins 14 PWM output pins 6 from 14 digital I/O pins Operating voltage 2.7 V - 5.5 V Flash memory 32 KB ( 2KB used for bootloader) Input voltage 2.7 V - 5.5 V Diameter 50 mm or 2 inches Thickness 0.8mm Analog input pins 6 SRAM 2 KB Power supply External power source, lipo battery EEPROM 1 KB Here’s a detailed description of the Arduino LilyPad pinout for both the LilyPad Arduino USB (with ATmega32U4) and LilyPad Arduino Simple (with ATmega328P). Understanding the pinout is essential for correctly wiring sensors, actuators, and peripherals in your e-textile and wearable projects. This version features the ATmega32U4 microcontroller with 9 digital I/O pins and 4 analog input pins. Pin Description Function D0 Digital I/O, RX (Serial) Used for receiving data via Serial communication (UART). D1 Digital I/O, RX (Serial) Used for transmitting data via Serial communication (UART). D2 Digital I/O, External Interrupt Can be used as a digital pin or for external interrupts (INT0). D3 Digital I/O, PWM, Interrupt PWM (Pulse Width Modulation) pin; can also serve as an external interrupt (INT1). D4 Digital I/O General digital input/output. Pickup Truck Window Visor,Toyota Tacoma Window Visor,Window Visor For Toyota Tacoma,Toyota Hilux Window Visor,Mitsubishi Triton window visor,ISUZU D-MAX window visor,Ford Ranger window visor,Hilux window visor Foshan Nanhai Txr AUTO Accessories Co., Ltd. , https://www.aeromaxfit.com
Arduino Lilypad Introduction:
Arduino Lilypad History:
Arduino Lilypad Datesheet:

Arduino Lilypad Pinout:

Lilypad Arduino USB ATmega32U4 pinout:
Pin configuration:

Arduino Lilypad: Pinout, Datasheet, Features, IDE and simulation
Our Pickup truck window visor is made from high quality ABS material, which has excellent toughness and abrasion resistance and will remain in its original condition even in extreme weather. In rainy weather, the Pickup truck window visor allows vehicle owners to open the windows slightly when parking or driving, thus promoting air circulation and preventing rainwater from entering the vehicle, keeping the interior dry and comfortable.It also blocks some of the direct sunlight, reducing damage to the vehicle's interior. When the window is slightly opened for ventilation at high speeds, it can also reduce noise and improve driving comfort.